bonsai-vplink
Lunar Lander VP Link model
The Lunar Lander model presents the traditional 2D game as a simulation with VP Link.
The situation is illustrated below. Your mission, should you choose to accept it, is to build a brain that manipulates the two lander engines, engine1 and engine2, to position the lander on the ground between the flags without crashing. Use the supplied VP Link loadable to create your Bonsai Simulator.
Layout of this example
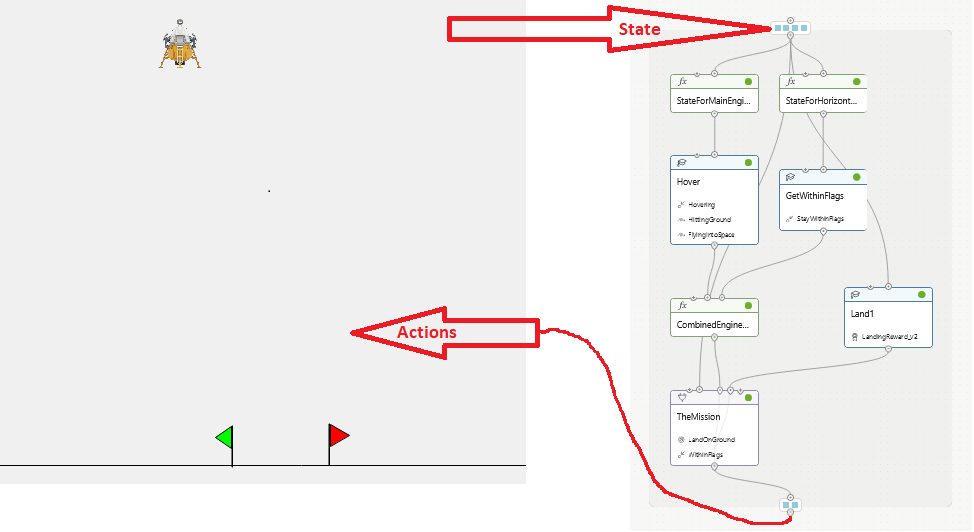
This is a complicated example. The files in this directory (the top level one) represent the completed brain that uses many features of the Inkling language. You will gain the most benefit from this sample if you start with the common files from this directory, and then add in the Inkling files in the various subchapters, starting with chapter 1. As you progress through the chapters, the documentation in each chapter folder will lead you through designing a brain that utilizes more of the Inkling features, describing along the way why those features are useed.
Simulation Description
A lander starts 40 m above the surface. The lander has two engines, engine1 and engine2. Engine #1 provides vertical thrust and will allow the 100 kg lander to hover (in Earth gravity) when its output is 0.5. The thrust from the lander is linear with the engine output.
The lander also has two horizontal thrusters to push it left and right.
To keep the controls simple, there is just a single output that controls
these two thrusters. This is known as a split-range controller in automation jargon.
The output ranges from -1.0 (full thrust left) to +1.0
(full thrust right). Zero output for engine #2 will result in no thrust to
the left or right by the horizontal thrusters. Note that by using the split range
controller, the situation where the left and right thrusters are fighting each other
is avoided. The split-range controller enforces the requirement that while one horizontal
thrusters is firing, the other is off. In addition to avoiding wasting fuel,
this also has the nice side effect of making
it easier to train the brain.
In a deviation from the original game, this lander does not have the ability to rotate. The engines are aligned with its center of gravity, and on-board gyroscopic stabilizers maintain its attitude.
The lander starts off hovering at some position. The space between the flags is 4 m and the lander itself is 2 m wide. The flags are centered around the (x,y) coordinate (0, 0).
Inkling Features used
- Multi-concept
- State reduction
- Learned concepts
- Programmed concepts
- The selector concept
- Action Masking
- Using a Visualizer
State Tags
- x_position – (-50 .. 50) meters – The horizontal position of the lander relative to the midpoint of the target flags.
- y_position – (0 .. 100) meters – The height above the surface.
- x_velocity – (-100 .. 100) meters/sec – The horizontal velocity of the lander, positive is to the right.
- y_velocity – (-100 .. 100) meters/sec – The vertical velocity of the lander, positive is up.
Action Tags
- engine1 – Range (0 .. 1), the output from the vertical (main) engine
- engine2 – Range (-1 .. 1), the output from the horizontal thrusters. Negative values move the lander to the left.
How to get started
If you just want to get to the final answer with the Lunar Lander, create a simulator from the lunarlander_sim.zip VP Link loadable and use the included lunarlander.ink file to train a brain. To do this, open https://preview.bons.ai/ in the web browser and open your workspace. To add the simulator, click the Add sim button located on the left pane. Select VP Link as the process simulator, drag and drop the lunarlander_sim.zip and type in the name to use for this simulator, “lunarlander”. Click on Create simulator; a simulator to train the Bonsai brain will be created in the workspace. Once the simulator is created, the select the simulator, click on Create Brain button and and type in the name of the brain (check for duplicate names). An untrained brain will be created.
Note that while this example is called the Lunar Lander, the gravity is actually set to that which we experience on Earth.
## I Just want to see it work
Copy the code from the Inkling file lunarlander.ink in this directory into the brain’s Inkling.
You can now start training the brain.
Warning: This is a complicated example. If you need it as a reference for a code sample, fine. However, if you actually want to learn something, see the next paragraph.
## I want to learn something In this case, now that you have a SIM, read the rest of this documentation page to get an understanding of how things work with a VP Link simulation, then go to Chapter 1, and follow the instructions to create a simple brain. Further chapters will discuss how to make incremental improvements to that brain until we end up with the final brain here in this directory.
Using initial conditions files
There is an Initial Condition file, StartingPoint.icf, that can reset the problem at the start of every episode. You need to specify this file name as the value for the intial conditions of the scenario in your lessons. The StartingPoint.icf puts the lander at 40 m above the surface, and 10 m to the left of the flags. The lander is hovering in place with engine1 at 0.5, so the x_velocity and y_velocity are both zero.
There is another initial condition file, called PreLandingPos.icf. This puts the lander at 4 meters above the surface and in between the flags. This is useful to practice landing.
Modifying the VP Link Loadable
The VP Link loadable contains the information for a specific simulation to run on the bonsai platform. Inside the loadable, there is a ./cfg/ directory which contains the VP Link model, and any initial conditions files needed to reset the model to a starting point. These initial conditions files are simple text files with commands in them to set the values of various VP Link simulation tags at the start of an episode. You can see a further description of a VP Link Loadable here
You can unpack the sim.zip file, duplicate the existing .icf file to a new one, and change the values in the file to set various simulation values to a different starting state. Simply rezip the contents (with the new file) and then you can use the new file name in the initialConditions: value of the scenario. It is also possible to specify multiple initial conditions files. In that case, they will be applied in order.
Further investigations
As this example is meant to be the basis of various investigations on how to train a brain, the following questions come to mind. If you follow the instructions in the various chapters, you should be able to answer these at the end.
- How effective is the brain training in a single-concept vs. multi-concept architecture?
- Can you architect a reward function that works as good as or better than the Goals?
- Can a brain that is trained to work in Earth gravity also effectively land the lander with Moon gravity? This is a common question that relates to the sim-to-real gap.
Further Resources
None, yet. Wait for it…