bonsai-vplink
Simple Tank VP Link model
The Simple tank model demonstrates the basics of a level control loop with Bonsai. While Bonsai is often used to provide setpoint guidance in a real-world deployment, this example assumes that Bonsai will be doing the direct control of the final element. A coming example will show how Bonsai can work with an existing controller to improve or modify its performance over a range of target control philosophies.
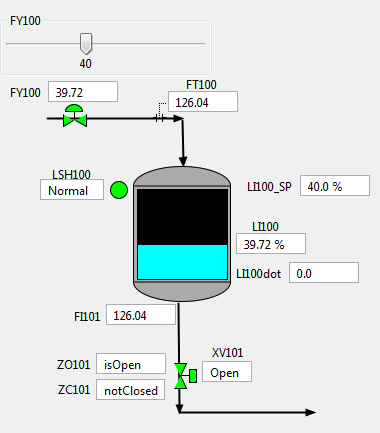
The process is illustrated below. Your mission, should you choose to accept it, is to build a brain that controls the two Action tags in order to bring the level as measured in LI100 close to the setpoint as given in LI100_SP for any given setpoint between 5% and 95% without overflowing the tank or letting it get empty. Use the supplied VP Link loadable to create your Bonsai Simulator. Read the supplied process description for more information about how the process works. This may give you some ideas about how to design your brain.
If you just want to see something working, use the supplied Inkling file and follow the instructions below to train a brain.
State Tags
- LI100 – the level in the tank
- LI100_SP – the target level setpoint
Action Tags
- FY100 – controls the inlet flow to the tank
Creating a simulator
Upload the loadable to create a sim
- With your loadable ready, follow the instructions to create a simulator using this loadable. Once you start the simulator and launch it to create the Inkling interface structures, you should see that the LI100 member of the SimState is an array with two elements. Once you are done with that and have a simulator created in Bonsai, come back here to create a brain and add the Inkling
Create a brain
- With the newly created simulator selected in the list sims on the Bonsai web page, Click the “Create Brain” button. Give the brain a name. You will see a new brain and some boilerplate Inkling that was created along with the necessary SimState and SimAction structures.
- What is missing at this point is the lesson plan to train the brain. Copy this code inside the curriculum {} section. ``` goal (s: SimState) { drive TargetLevel: s.LI100 in Goal.Sphere(s.LI100_SP, 0.5) # Get the level near the setpoint avoid Overflow: s.LI100 in Goal.RangeAbove(100) # Do not overflow the tank } training { EpisodeIterationLimit : 75 # The brain only has 75 iterations to make this work }
A very simple lesson (for people) that covers the entire state of interest
lesson StartFromRandomLevel { # Scenarios set the values in the SimConfig to drive the starting state scenario { # configNumber: < 1, 2, 3, > _configNumber: 0, # deprecated _initialConditions: “”, _timeStep: 5, _reportEvery: 15, LI100: number <20..90 step 2>, # BRAIN needs to see all sorts of starting levels… LI100_SP: number <20..80 step 1>, # …and a variety of starting sepoints. } } ```
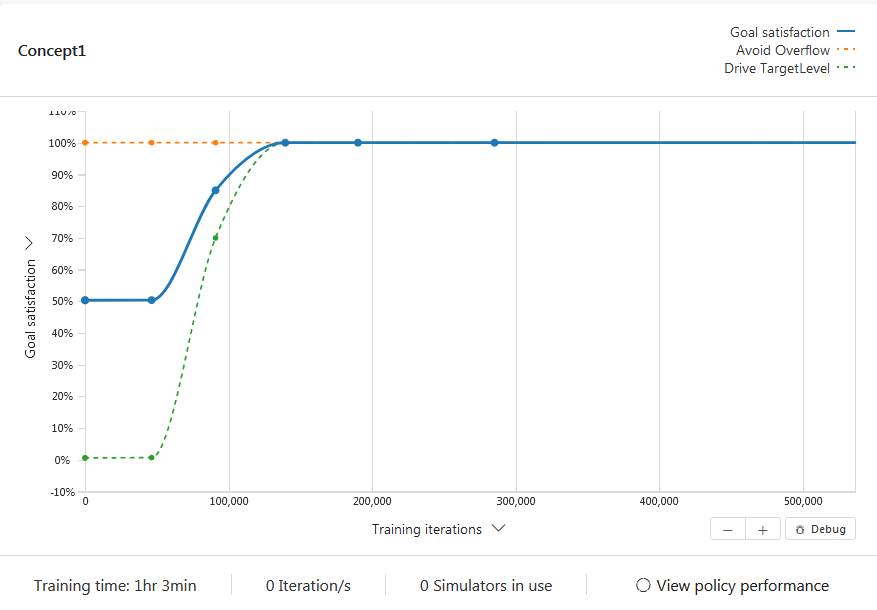
- Now you are ready to train the brain. Click the green Train button.
It will take a minute or two to get started, but soon enough you will see the brain communicating to multiple simulators as it begins the training.
With 10 simulators you should start to see some progress after about 15 minutes, and the brain completes the training after about 150,000 iterations.
For VP Link Users
If you have VP Link installed locally, you can use the SimpleTank.rev file to run the simulation locally. Ensure that the tools are installed and try the following to build a new loadable that can improve the training performance of the brain.
In the sample model, only the current level is sent in the state to the brain. It might be useful if the brain also knew if the level was going up or down. You can include some historical values from previous time steps in the SimState by simply setting a value in the History column of the Bonsai Interface page. Below are the steps to create a new loadable that has the current level and the level from the previous time step.
Start a local copy of VP Link
- Start the VP3 Control Panel from the Start menu. It is under the VP Link folder in the Start Menu. The picture below shows the VP3 Control Panel.
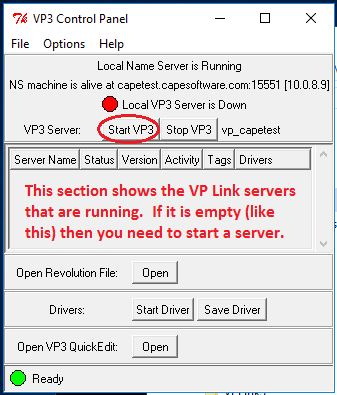
- Ensure that a VP Link server is running. If the middle area of the VP3 Control Panel is empty, then click the “Start VP3” button.
- Double-click the SimpleTank.rev file from this directory to open the VP Link GUI for this model.
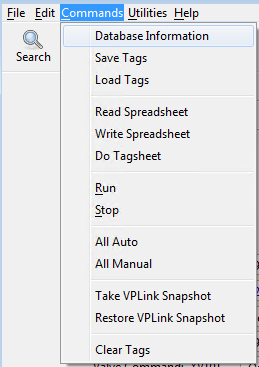
- From the Commands menu, choose “Database Information” to ensure that there are 16 tags loaded in the server. If not, you will need to clear the tags (Commands/Clear Tags)
and reload the tag database (Commands/Load Tags…/Choose simpletank.tag)
- Now with the tags loaded, use the “Next” button on the toolbar to get to the page that shows the picture of the tank.
- On this page, you can enable the VP Link calculations (use the “Calcs” checkbox at the right of the toolbar), and manipulate the inlet valve position to change the flow into the tank. You can also click on the XV101 valve at the bottom to open and close it.
- If you have turned on the calcuations, turn them back off, and reload the original tag file (Commands/Load Tags…). This will put the simulation back to a steady-state condition.
Create the VP Link loadable
- Now we are ready to change the VP Link loadable. Click the “Bonsai Interface Page” button to get to the Bonsai Interface page.
- On this page you can create a new VP Link loadable. Click in the “History?” column in the State Tags in the row for the LI100 tag.
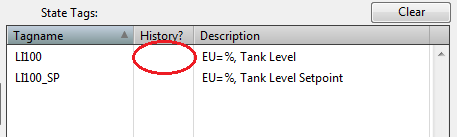 Enter a 2. This will put two values for LI100 in the SimState, the current value and the previous value.
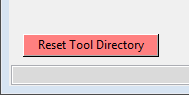
 - Hover your mouse over the “Build Bonsai Interface” button. If it goes pink, that indicates that you need to reset the location of the Bonsai tools. If it is green, then skip to the next step. Click the “Reset Tool Directory” button to clear the stored (and incorrect) location of the Bonsai Tools. In the next step you will have a chance to locate the necessary tools.
- Click the “Build Bonsai Interface” button. If this is the first time you are building the interface, you will be asked if you want to create the necessary directories. Answer “Yes” to those questions–pay attention to the location of the “Yes” and “No” buttons. This will create a “loadable” folder in the directory containing your GUI .rev file. In the “loadable” folder, there will be another folder with the name that is specified in the “Loadable SubDir:” field. You can change the sub-directory name to keep track of various versions of your loadables. The “Build Bonsai Interface” button creates the vplink_interface.JSON file that is needed in the next step.
- Once you have built your interface file, you are ready to create the loadable. Click the Create Bonsai Loadable” button. If you cleared the location of the tools, this button will ask for the location of the CreateBonsaiLoadable.exe file. Answer any other questions with “Yes”, and your loadable will be created. You will see messages come up in the Message Box. This shows you which files were included in the loadable. The last line should indicate that the loadable was created and where it is. You can use the “Show Loadable” button to bring up an Explorer window showing the folder with the loadable file in it.
Further investigation
Once you have your brain trained, perform an assessment. Do you see any difference in how the Bonsai brain controls the valves vs. how a PID controller might do it? If you are a VP Link user, put the XV101 valve in manual during the assessment. This will remove the ability of Bonsai to control it. How does the brain perform when it has the proverbial “arm tied behind its back”?